Slides Studio Plugin
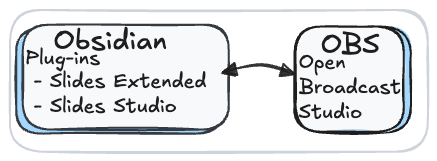
Slides Studio is an open source plugin that enables slide presentations created in Obsidian to control Open Broadcast Studio (OBS).
The plugin extends the features of the Slides Extended plugin.
Setup
Download the required applications and plugins
- Open Broadcast Studio Free and Open Source software for video recording and live streaming.
- Obsidian Free tool for organizing notes.
- Slides Studio - Control OBS with Reveal js slides
- (optional) Slides Extended a plugin to create Reveal js slides in Obsidian Markdown syntax
Installation
Use the installers for OBS and Obsidian.
Slides Studio plugin has not been added to the Obsidian Community plugins yet.
To manually install the plugin
- Download the latest release from Slides Studio.
- main.js
- manifest.json
- slides-studio.zip
- In Obsidian, open your vault's root folder in your file explorer.
- Navigate to the
.obsidian/pluginsdirectory. If it doesn't exist, create it.- this folder is hidden in macOS, press 'command + shift + . ' to see it.
- Extract the contents of the downloaded
.zipfile into a new folder within thepluginsdirectory namedslides-studio. - Copy the file
manifest.jsonandmain.jsinto the folderslides-studio. - Restart Obsidian or reload your vault.
- Go to
Settings>Community Pluginsand click theturn on community pluginsbutton - Enable Slides-Studio.
Slides Extended is installed through the Obsidian Community plugin store.
- Open Obsidian and go to
Settings. - Click on
Community Plugins. - Click on
Browse. - Search for
Slides Extended. - Click
Installon theSlides Extendedplugin. - After installation, make sure to enable the plugin by toggling it on in the
Installed Pluginssection.
Obsidian Settings
Open the Obsidian settings.
In the Files and Links section, enable show all file types
In the Core Plugins section, enable Web viewer
Slide Studio Settings
Web Server
Slides Studio includes a Fastify server to create an API between Obsidian and OBS.
Enable the plugin server to start the plugin server on the localhost.
- Server port set the server port.
OBS websocket server
The OBS websocket server is used to send messages to OBS.
- IP: localhost, Port: number, Password: Letters and Numbers
OBS Launch parameters
- Name: OBS app name, MacOS default = "OBS"
- Path: on windows enter the path to the OBS executable file.
- Collection: start OBS with a specific OBS collection. Enter
Slides-Studiofor the OBS collection name. - OBS collection: Slides Studio includes an OBS collection.
- to import the collection, copy the collection path
- open OBS.
- click
Scene Collection > Import - paste the collection path in the
collection pathfield.
- OBS Browser source debug port: Browser sources can be debugged at http://localhost:{port}
Open OBS
Click the Launch button to open OBS
Connect to the OBS websocket server
Click the connect button to connect Obsidian to the OBS webscoket server.
Using the Slides Studio view
Click slides studio, 
Open Slides Studio
Clicking the open slides studio button will open a web view tab.
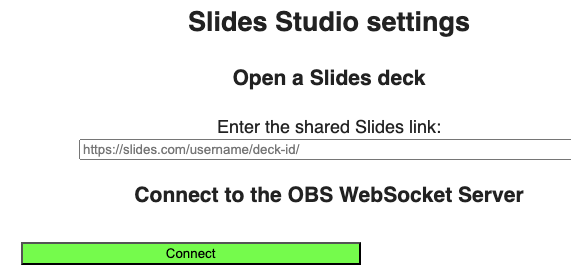
Enter a link to a slides.com presentation or the relative path to a presentation in the Obsidian vault
- example slides.com link, https://slides.com/uuoocl/deck-48ea10
- example vault relative path, export/Welcome/index.html
- right click (ctrl + click) on a .html file, then select Copy relative path
Click the connect button
The Slides player will appear
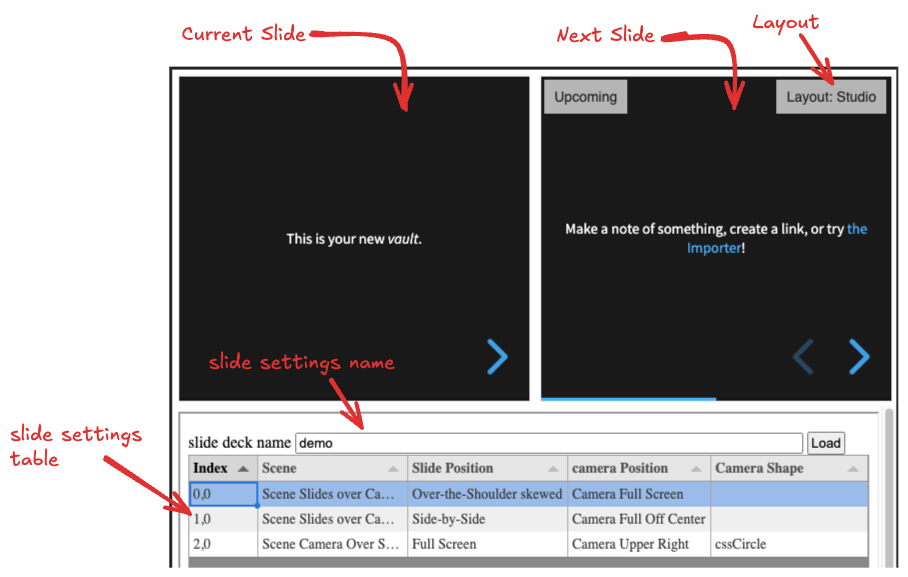
Layout: select "Studio"
Enter a name for the slide settings table.
Set the 'Scene', 'Slide Position', 'Camera Position' and 'Camera Shape' for each slide.
As the slides transition, the slide settings are applied to OBS.